In this article
Luminosity masks
We all have seen pictures of marvelous sunrises, breathtaking views of cities with great sunset on the sky and shots of milky way leading up to the moon. But even if it's a subtle image of misty forest in soft morning glow, rare photograph stays with no post processing.
It is much easier to work with masks when using a Free Luminosity Masking Panel.
Many photographers use Lightroom to process their images. It's a great tool that offers lots of possibilities, from basic adjustments to careful and targeted changes applied to the image. But sooner or later, you stumble onto biggest Lightroom limitation - lack of layers and easy to use masks.
Usually you feel the need to mask something when you want to limit the effect you applied. This could be a global saturation adjustment that you want to dial down in some parts of the image. Even more you feel this need when you have several exposures for the same scene - some for bright parts, some for darks, maybe even milky way - and Lightroom just simply can't handle it. This is when you jump into Adobe Photoshop, with all it's power.
If you are just starting with processing and masks in Adobe Photoshop, be sure to read first lesson of my Free Luminosity Masking Course about kinds of masks in Adobe Photoshop
But even there, painting masks with brushes, you are limited - it's hardly possible to paint an accurate enough mask when you have dark trees in front of the bright sky. Other example of scenes that can't be handled nicely with regular masks could be long exposure images of water or trails of car lights in the city.
This is where you need luminosity masks.
What are luminosity masks
Luminosity masks are masks in Adobe Photoshop that are based on the brightness/luminance of every pixel of the image.
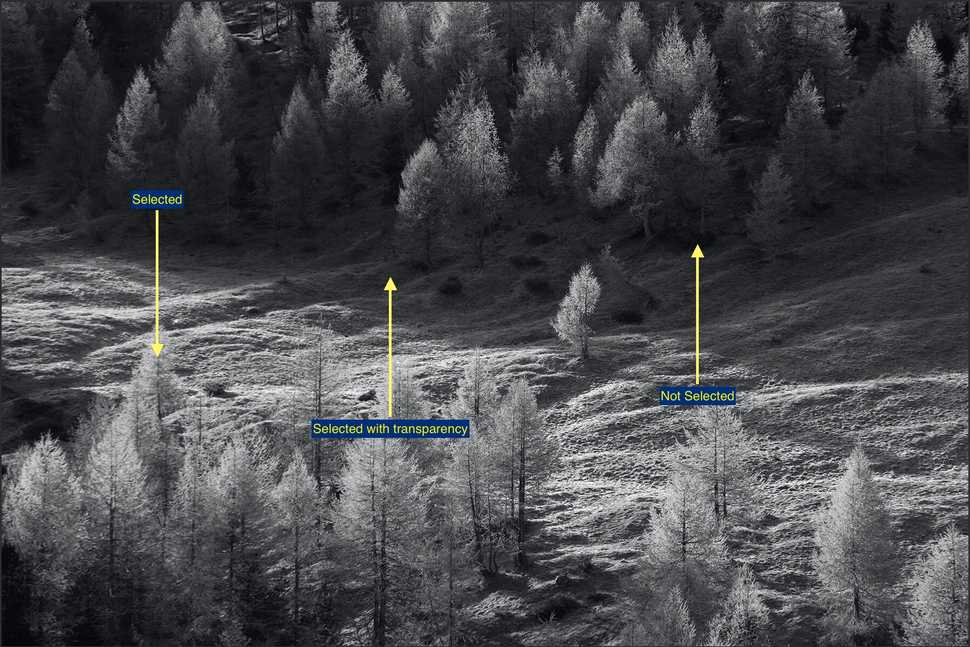
Imagine your image converted to black and white. As with every mask in Adobe Photoshop, bright parts will be selected and dark parts will be not. But because our black and white image has grey areas, that means that there will be a selection range, and some parts of the image will be selected with transparency level - this is what gives luminosity masks their accurate look.
Turned out that such a simple concept gives a lot of power when processing an image. Combined with the fact that every selection can be adjusted with levels or curves adjustments in Adobe Photoshop, photographers were finally able to select almost every part of the image and target their processing effects very nicely.
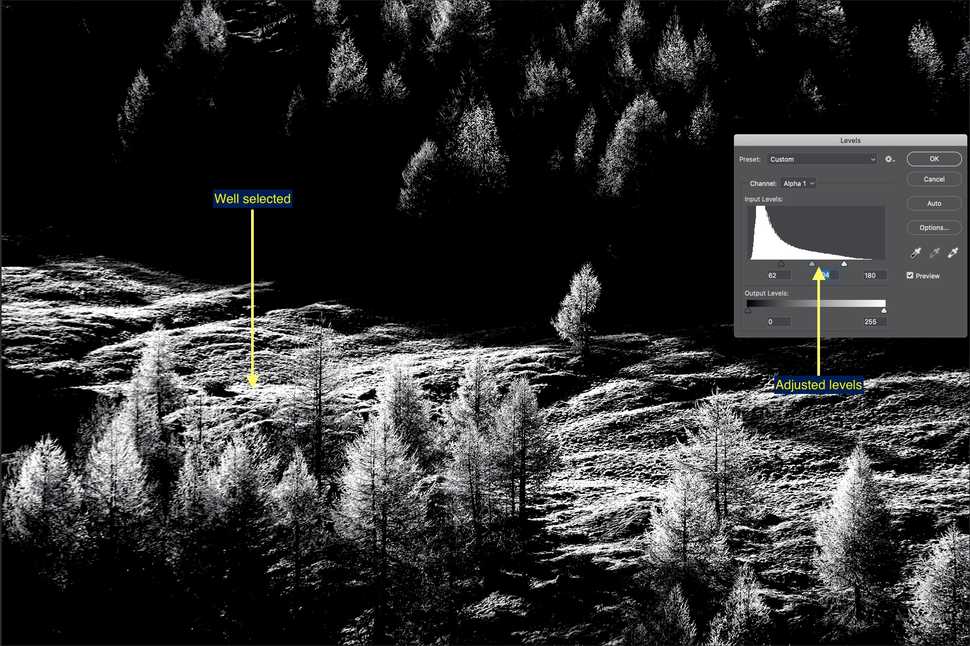
For example, if you use levels on your black and white version of the image, you could make only the brightest elements white and everything else - dark, coming up with selection of bright parts of the image.
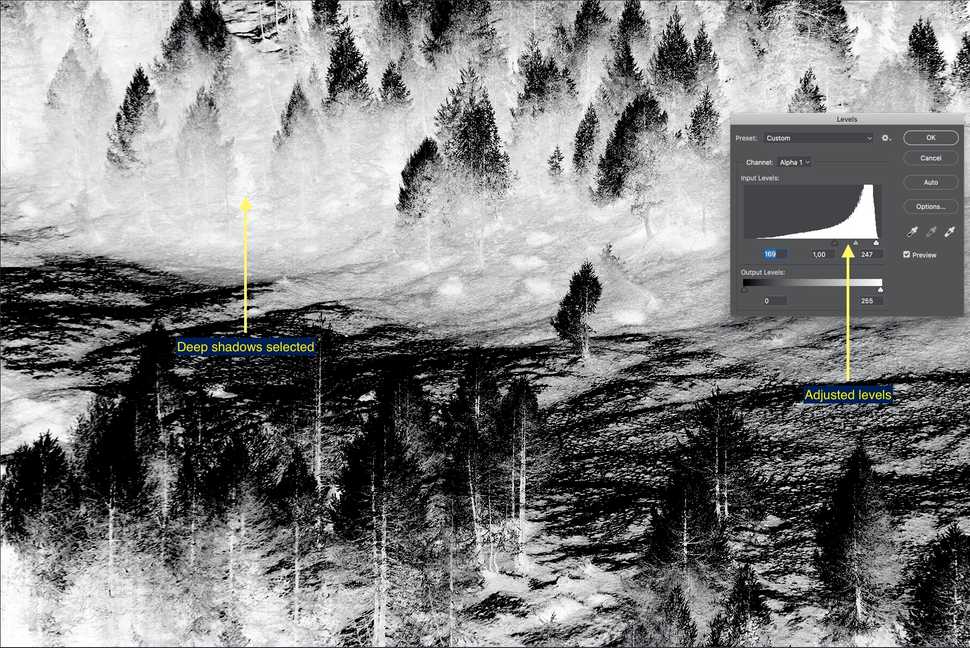
On the other hand, having the image inverted and adjusted a little, you would get deep shadows selection.
Usually when speaking about luminosity masks, people mean the following kinds:
- Brights/Lights/Highlights
- Mids/Midtones/Middle range
- Darks/Shadows
But over the years following the concept of luminosity masks, photographers came up with new mask bases - saturation, color luminosity, color hue and others. So now we can also add to the mix:
- Saturated lights/mids/darks - tone range based not on luminosity, but on saturation
- Red, Green and Blue luminosity lights/mids/darks
- Color range mask based on luminosity of the color pixels
- Color range mask based on saturation of color pixels
- Zone mask - this is the Adams' Zone, slicing the image into tonal ranges
All these new masks opened new possibilities for image processing.
Why and when to use luminosity masks
Why would you use luminosity masks, which problems exactly can it solve?
You see, luminosity masks is a great instrument, a way to select any part or tonal range of the image. It's hardly possible to list every place where luminosity masks are used.
Here are just some of them:
- blending multiple exposures
- controlling details over the image
- color correction
- controlled adjustments
- targeted color grading / toning
- accurate sky replacement
- compositing
As you can see, capabilities are almost endless.
Because mask is only there to limit the effect of the layer, you are free to use luminosity masks with almost every effect you can imagine. Feel free to experiment!
- lights mask + curves/levels = control over details in lights
- darks mask + curves/levels = control over details in shadows
- midtone mask + curves/levels = control over details excluding lights and darks
- lights mask + image = blending exposures
- lights mask + color = color toning in lights
- darks mask + color = color toning in shadows
- mask + any filter = apply the filter over the mask
Mask tells Photoshop where the effect will be. Controlling the strength of the effect layer with opacity + applied mask gives great results.
If you feel a little overwhelmed by how many things luminosity masks can do - don't worry. So was I when I just started. Now you can follow my step-by-step guide on luminosity masking basics. It will teach you all the details and provide practical examples.
How does it work
How to build luminosity masks manually
Being such a popular concept, luminosity masks are not easy to create even now, in 2020. There are still many steps involved that can feel a bit too technical. Let me walk you through.
To skip technical manual part to a more user-friendly, fast and easy way to create masks, read about Free Luminosity Masking Panel.
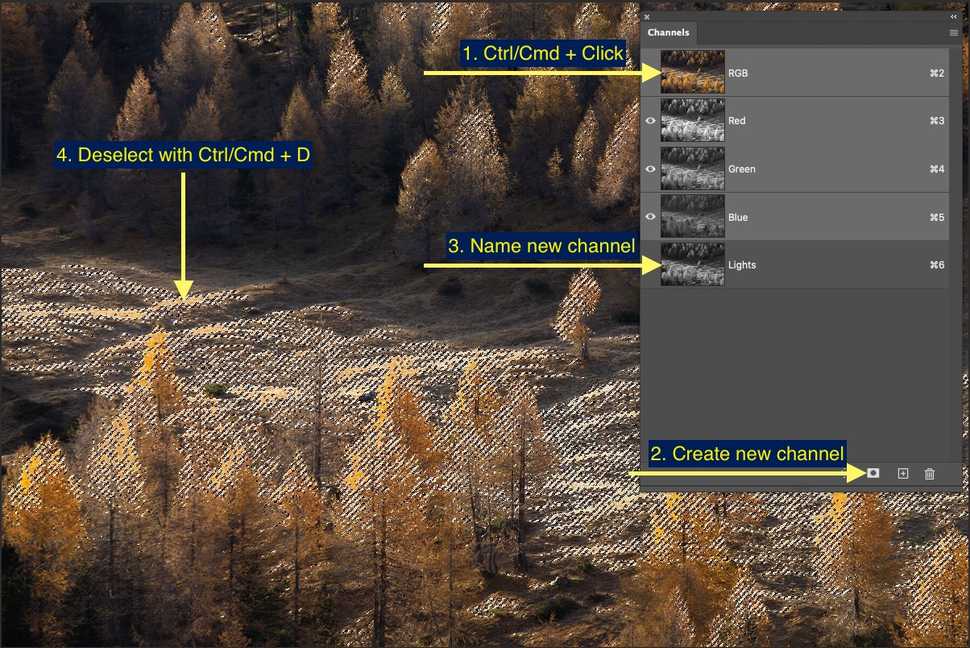
- Open Channels tab (Window - Channels)
- Ctrl/Cmd + Click on RGB channel
- Save the selection to new channel
- Rename newly created channel into Lights
- Deselect everything Ctrl/Cmd + D
This gives you Lights mask.
The way Ctrl/Cmd+Click on channel works - it selects everything that is brighter than 50% grey on the image. Which is exactly what we want - lights selected.
Many guides will suggest you to do very complicated clicks to get other masks. Shift-Alt-Ctrl / Shift-Option-Cmd + Click is a shortcut to intersect selections, so selecting and intersecting selections with each other refines selection to give you brighter and brighter parts.
The most kept secret of luminosity masks
Luckily, everything can be done much easier.
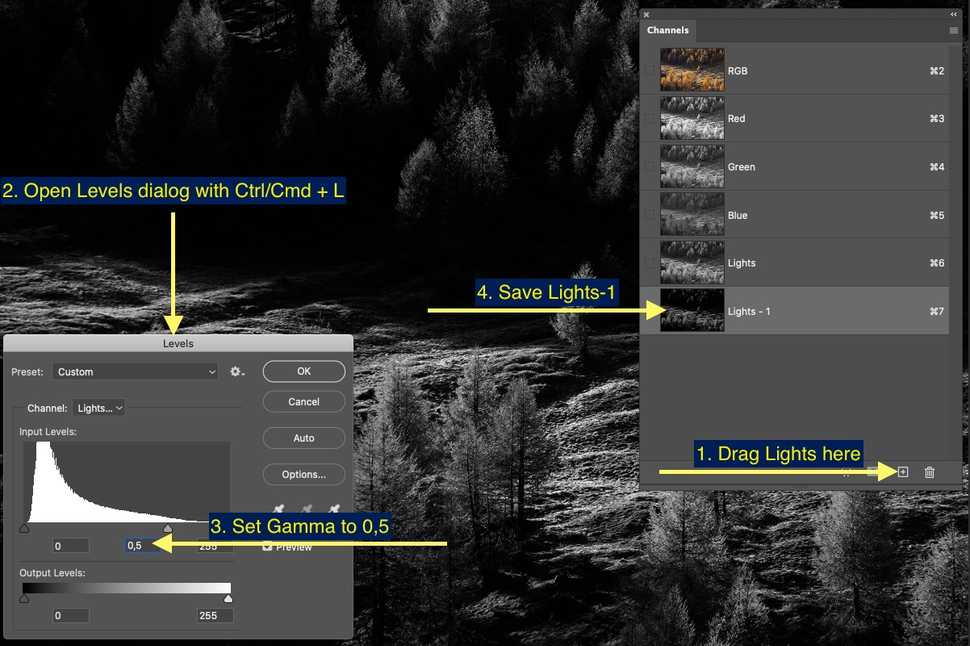
- Copy your Lights and rename them to Lights-1. To do that you can drag your channel to the new channel icon at the bottom.
- Now press Ctrl/Cmd + L to open Levels adjustment
- Move the middle slider, the gamma, to value
0.5 - Now you got your Lights-1 mask, you can save it into channels.
Use this gamma levels to get other all kinds of lights luminosity masks:
- Lights = 1
- Lights-1 = 0.5
- Lights-2 = 0.25
- Lights-3 = 0.125
- Lights-4 = 0.0625
You get the idea =)
Now let's do Darks.
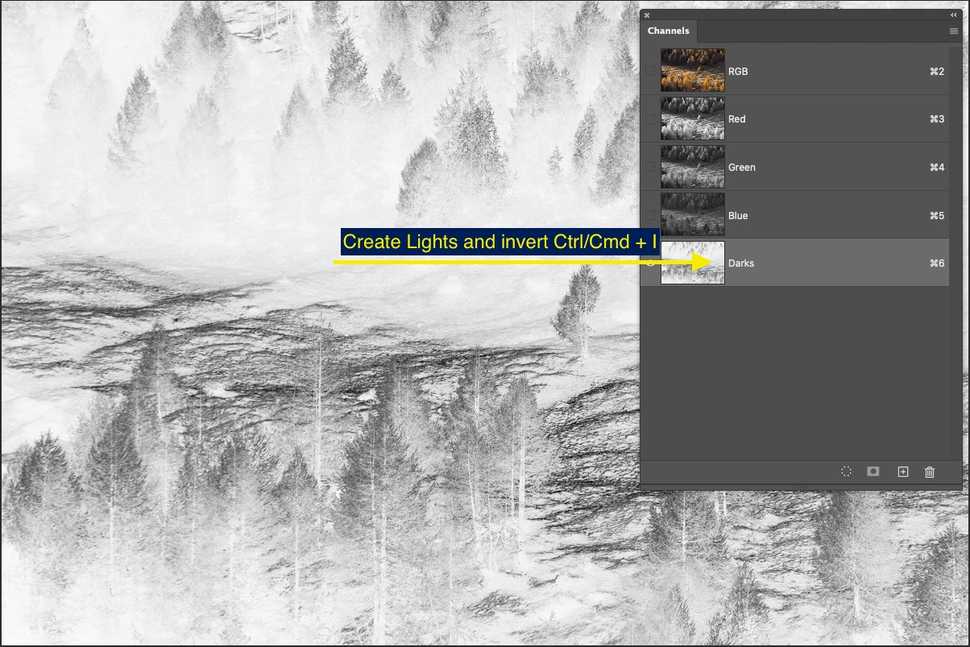
- Create Lights
- Invert channel by pressing Ctrl/Cmd + I
- Rename channel into Darks
- Deselect everything Ctrl/Cmd + D
This is your darks mask. We can now apply the same technique as to the lights to make dark masks. Here are gamma values.
Here are gamma values to get different masks:
- Darks = 1
- Darks-1 = 0.5
- Darks-2 = 0.25
- Darks-3 = 0.125
- Darks-4 = 0.0625
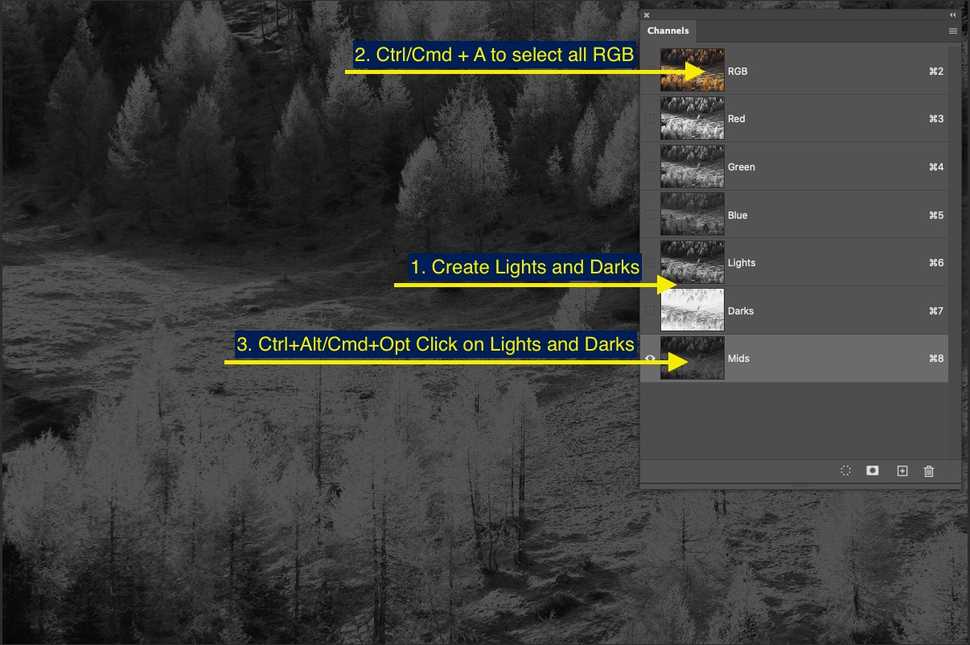
The tricky part is in Mids. Here, unfortunately, there is no secret. You just need to subtract Lights and Darks mask from the whole image.
To do that, first create Lights and Darks masks to the level of Mids you want to get. Then
- Open Channels tab, click on RGB channel and select it all with Ctrl/Cmd + A
- To subtract lights hold Ctrl+Alt/Cmd+Opt and click on lights layer you created before
- Now subtract darks layer the same way
- Create new channel and call it Mids.
Now here comes a little problem, that is not critical, but still is there.
Technically, Lights is 50% of the light part of the image, and Darks is 50% of the dark part of the image. If you have your whole image and then subtract Lights and Darks from it, you should get a black image, because you just removed all elements of the image, lights and darks.
Subtracting with channels still returns some kind of image. It is mathematically wrong and is the reason why before people would have Lights-1 Mids-1 and Darks-1. There can be no Mids-1, Mids-1 should be a black picture.
Still, even with this calculation error due to manual steps, you do get some kind of mids mask that is still absolutely useable for processing. Luminosity masking panel can solve this mathematical error.
Following the same approach you can subtract from the whole image Lights-2 and Darks 2 to get Mids-2 and so on.
How to use luminosity masks
Now that you have all your masks created in the channel, it's time to use them.
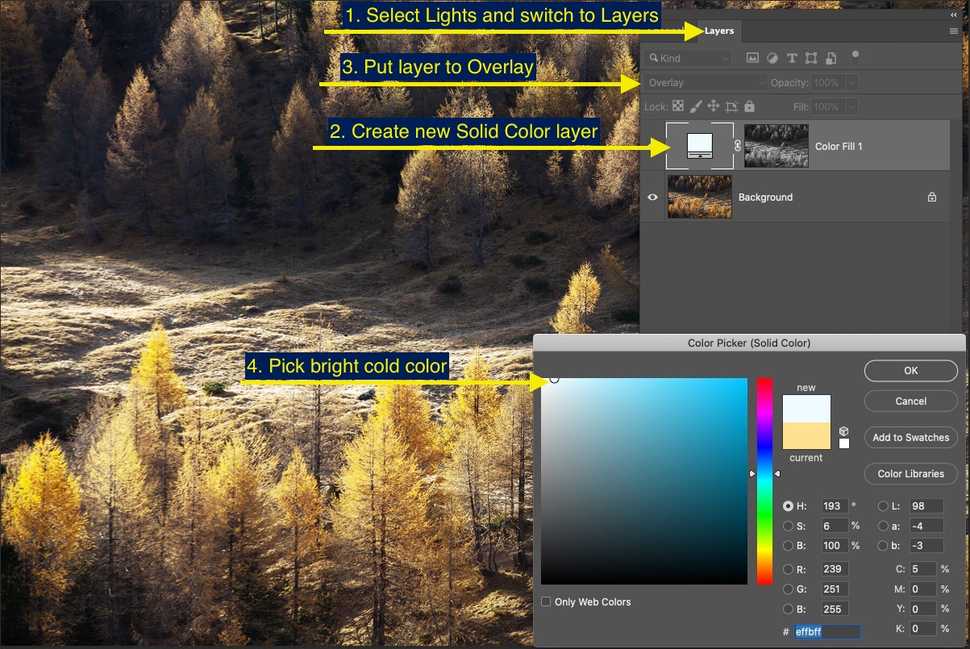
- Open your Channels tab
- Ctrl/Cmd + Click on your Lights channel
- Switch to Layers tab
- Create new Solid Color adjustment layer
- Put layer into Overlay mode
- Pick some bright cold color
This will cool down your lights a bit.
Things to be mindful about here. Ctrl/Cmd + Click creates a new selection. Sometimes you can get a warning dialog that selection can not be displayed. It's fine, but a little annoying. Also keep in mind that because there is selection, it will be applied to next action you make. Sometimes it results in weird effects.
Another important thing to note is that you create luminosity masks at
this moment. Changes that you make to the image are not automatically synchronized to created luminosity masks, so most likely you would have to re-create luminosity masks over and over again after every change you make.There are many different ways you can use luminosity masks. Some of them are explained in details in my free luminosity masking course.
Free Luminosity masking panel
Clear the state and remove temporary panel channels.
ClearEnables Quick Apply mode when preview is disabled and clicking on buttons instantly replaces mask in the currently selected layer
Creates a new group with mask filled white color
Creates a new group with mask filled black color
Generates endless color grading combinations of colors that look good together.
SOURCE
Creates a Luminosity mask and uses it as a source for future mask calculations. Will be used until applied, replaced with another source or cleared.
LuminosityCreates a Luminosity mask using luminosity of the Red channel and uses it as a source for future mask calculations. Will be used until applied, replaced with another source or cleared.
RCreates a Luminosity mask using luminosity of the Green channel and uses it as a source for future mask calculations. Will be used until applied, replaced with another source or cleared.
GCreates a Luminosity mask using luminosity of the Blue channel and uses it as a source for future mask calculations. Will be used until applied, replaced with another source or cleared.
BCreates a Saturation mask using most saturated pixels of an image and uses it as a source for future mask calculations. Will be used until applied, replaced with another source or cleared.
SaturationAllows to build a mask using color range sliders. Uses Luminosity by default, but if Saturation is selected will select saturated color ranges. Click to start.
MASKS & ZONES
Allows to select any luminosity range using sliders. Builds mask on True Luminosity, ignoring colors. May not match luminosity exactly. Click to start.
Builds Darks mask
DarksBuilds Lights mask
LightsBuilds Darks-1 mask
Darks 1Builds Mids-1 mask
Mids 1Builds Lights-1 mask
Lights 1Builds Darks-2 mask
Darks 2Builds Mids-2 mask
Mids 2Builds Lights-2 mask
Lights 2Builds Darks-3 mask
Darks 3Builds Mids-3 mask
Mids 3Builds Lights-3 mask
Lights 3Builds Darks-4 mask
D 4Builds Mids-4 mask
Mids 4Builds Lights-4 mask
L 4Builds Darks-5 mask
DBuilds Mids-5 mask
Mids 5Builds Lights-5 mask
L0
1
2
3
4
5
6
7
8
9
10
REFINE & APPLY
Let's you build a new mask and add it to the current mask. Use = to calculate result.
Let's you build a new mask and subtract it from the current mask. Use = to calculate result.
Let's you build a new mask and multiply it to the current mask. Use = to calculate result.
Builds result of calculation.
Refine with
Allows to refine the mask using Levels adjustment
LevelsAllows to refine the mask using Curves adjustment
CurvesAllows to refine the mask by inverting it
Apply to
Creates new Levels adjustment layer as sets built mask on it
Creates new Curves adjustment layer as sets built mask on it
Creates a new selection using built mask
Applies built mask to the currently selected layer
To LayerPaint current mask onto layer mask. Sets foreground color to white, selects brush. If layer has no mask, sets black mask, otherise paints on existing mask. Hides marching ants.
- Creates new Curves adjustment layer as sets built mask on itCurves
- Creates new Levels adjustment layer as sets built mask on itLevels
- Creates new Brightness/Contrast adjustment layer as sets built mask on itBrightness/Contrast
- Creates new Hue/Saturation adjustment layer as sets built mask on itHue/Saturation
- Creates new Exposure adjustment layer as sets built mask on itExposure
- Creates new Solid color adjustment layer as sets built mask on itSolid color
- Creates new Black & White adjustment layer as sets built mask on itBlack & White
- Creates new Photo filter adjustment layer as sets built mask on itPhoto filter
- Creates new Vibrance adjustment layer as sets built mask on itVibrance
- Creates new Color balance adjustment layer as sets built mask on itColor balance
- Creates new Selective color adjustment layer as sets built mask on itSelective color
- Creates new Channel mixer adjustment layer as sets built mask on itChannel mixer
Even though it is entirely possible to create luminosity masks manually it is still a cumbersome task. You can record an action, but it will be a bit slow, generate lots of unnecessary channels and polute history.
It is even more difficult to manually create advanced kinds of masks - saturation, color, hue, zones.
All these issues are solved by luminosity masking panels that are smartly built not only to be fast and reliable, but also provide many more advanced retouching instruments.
ARCPanel is a free luminosity masking panel. You can find more details on the homepage.
Preparing login widget...
